Assignment#11: I used an image of my choice as the background and then used glass text to create my title. I used the bevel and emboss effect for the the rest of my texts. Finally, I added clip art to complete my noche de ciencia flyer.

Assignment#12: I used google images to find an outfit I wanted to work with and then I used magnetic lasso on the original image to clip the dress and create a new layer with the copy merged function. I used google images then to find a texture of my choice and then I used lighter color as the blending mode to apply the texture to the outfit. And, finally I labeled my before and after image with the text tool.

Assignment#13: In this assignment, we mimicked the NYC food bank's change one thing. In my poster I replaced skittles with healthy nutritious fruits of various colors that skittles come in. I used the clipping tool to clip images of the fruits and used the erase tool alongside to erase the skittles and add the fruits. I used pillow emboss on my text with a solid background and mimicked the original poster as best as I could. To add the final touch I clipped NYC Food Bank's logo and added it to my finished poster.
Original poster can be found here: Change One Thing

Assignment#14: For this assignment, I first created a radial gradient background of black and brown colors. Then I used magnetic lasso to clip the image of a pumpkin from an already existing image. Then I adjusted the hue and saturation to adjust the color of the pumpkin. After that I used the pen tool to draw the carvings onto the pumpkin and proceeded to adjusting the blending options, gradient overlay and stroke effects to create the glow of the pumpkin. I used the feather tool to create the shadows and then I used the clouds filter multiple times and adjusted the blending mode of that layer to create my background. I clipped a big portion of the background clouds and copy pasted it onto a different layer, adjusted to desirable size, opacity and color to create the fire coming out of the pumpkin. Then I added the final touch by using the text tool and Bevel and emboss effect to create my text with the curlz mt font.

Assignment#15a: In this assignment, I used a vintage Brick wallpaper and a flag of my choice to create a painted effect look. I used the Photoshop to create a displacement map with the flag and brick image using the distort filter. I placed the displacement map over the image and adjusted opacity to get the desired look and also the blending mode had to be changed to hard light for the image to show.

Assignment #15b:
In this assignment I used a butterfly image and my own image to create a painted effect. I created a displacement map and placed it over the layers and adjusted the blending mode and opacity for the desired effect. Finally, I used the lasso tool to clear the image around the pupil area to show my eyes.

Asssignment#16:
In this assignment I used Adobe Photoshop to create a motion blur effect. I used smart filter function and then a motion blur filter to create the illusion of the car being in motion.

Assignment#17:
In this assignment I used a quick mask to alter the appearances of specific parts of the image. I used the brush tool to create my mask and then I filled the selected areas with colors and opacity of my choice.
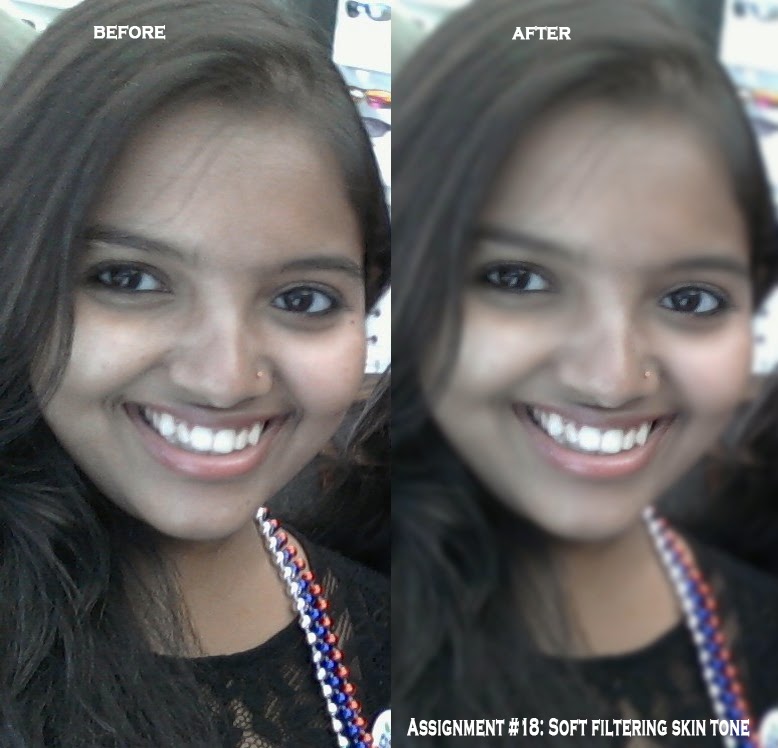
Asssignment#18:
In this assignment I added a soft focus effect to make the portrait glow. I used a combination of smart filters and face masks. I added a Gaussian blur effect to the layer and then i cleared the areas of focus to make them stand out which are the eyes and mouth areas.

Assignment#19: In this assignment we used Adobe Illustrator to to create a flashdrive with shapes and gradient tools using the function in the Like Photoshop mode. We used the rectangle, rounded rectangle and ellipse tools to create the body and the rectangle and pen tools with gradients to create the metallic part. We aligned the image to the center of the page vertically. Finally, I added text to finish my image.

Assignment#20: In this assignment we used Adobe Illustrator to create a realistic wireless phone. We used the shapes and gradient tool in Like Photoshop mode. We also used Wingdings and Symbols fonts to create some of the necessary symbols. Using the text tool we added text to the buttons previously created by the rounded rectangle tool and distort and transform functions.